Sunday, February 16th, 2014 at 9:30 pm by ba3 — Category: Demo Tools
If you would like to: 1) learn more about OpenStreetMap data, 2) understand the OSM ecosystem better, 3) have fun playing with OSM data, and/or 4) create your own compact vector maps for display in the BA3 Altus Mapping Engine… then you can get a great deal of enjoyment out of playing with BA3′s MapShop product.
One small caveat: Mapshop is not a program designed for the masses like the iPhone is designed for the masses. It requires a bit of the DIY spirit and a tolerance for a few rough edges. But if you are a person who feels generally comfortable with the idea of databases, command lines and parameter setting, you can have a very good time with MapShop. Also, you need a Mac running OSX.
Step 1
Step 1 is to get MapShop set up and operational on your machine.
The basic process is:
- Download and install GEOS
- Download and move the Mapshop files to their correct locations. Try out Mapshop.
- Download and install Postgres and PostGIS, along with pgAdmin3
- Download a few other tools
- Download an sqlite editor like Base
- Download the coastline file and do a test to make sure everything is working in Mapshop.
Congratulations - you are ready to play with Mapshop!
Step 2
Step 2 is to get some familiarity with the tools at hand. There are three tools that you will be using to play with OpenStreetMap data:
- MapShop itself, to view your maps
- Base, to edit your features and styles in the map
- PGAdmin3, to look at data in the database
If you have the Coastline data working from step 1, go to your Dump directory at ~/Dump. Open the file MapShopSessions.sqlite with Base. Click on the Data tab in Base. You should see something like this:

This is a query into the PostGIS database to extract the geometry for the coastlines. We can use pgAdmin3 to look at the coastline table and see what it contains. When you open it, pgAdmin3 will look like this:
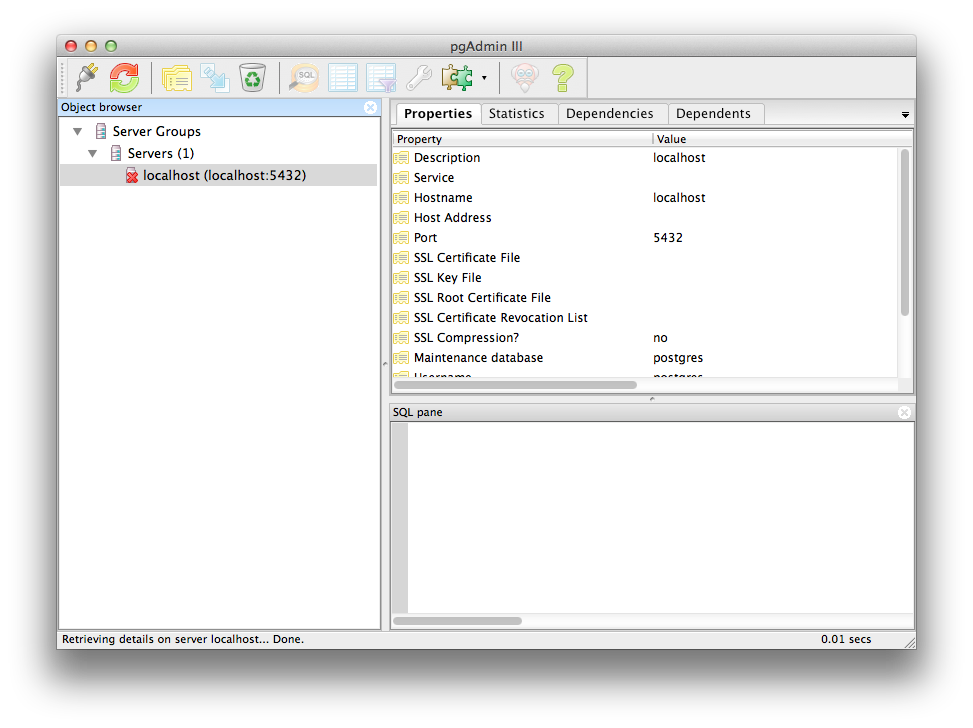
Double-click on LocalHost and log in to see the metool database. We are looking for the ne_110m_coastline table, like this:

Now open the table to view its contents (the grid-shaped icon at the top of pgAdmin3 will open the table). The contents look like this:

You can see a column named “geom” that contains “geometry(MultiLineString,4326)”. 4326 is the projection, and it is important because this is the projection that Mapshop uses. Now if you look back at Base, you can see why this query works:
select geom from ne_110m_coastline
ne_110m_coastline is the name of the table in the database and geom is the name of the column containing geometry for Mapshop to display.
Now go back to Base and click on Styles, like this:

The word Coastlines here connects back to the query in the Features table. Scale set to zero indicates that this style will apply at all zoom levels. Color here is set to ffffffff, which is white. (Red, Green and Blue guns are all 100% on (ff), and mix together to create white). Width is the line width. 1 is a very narrow line, 10 is a much thicker line.
Since we are editing MapShopSession.sqlite, we can go back to Mapshop and click on the Vector Map 1 button at the top. We see the coastlines in white, like this: 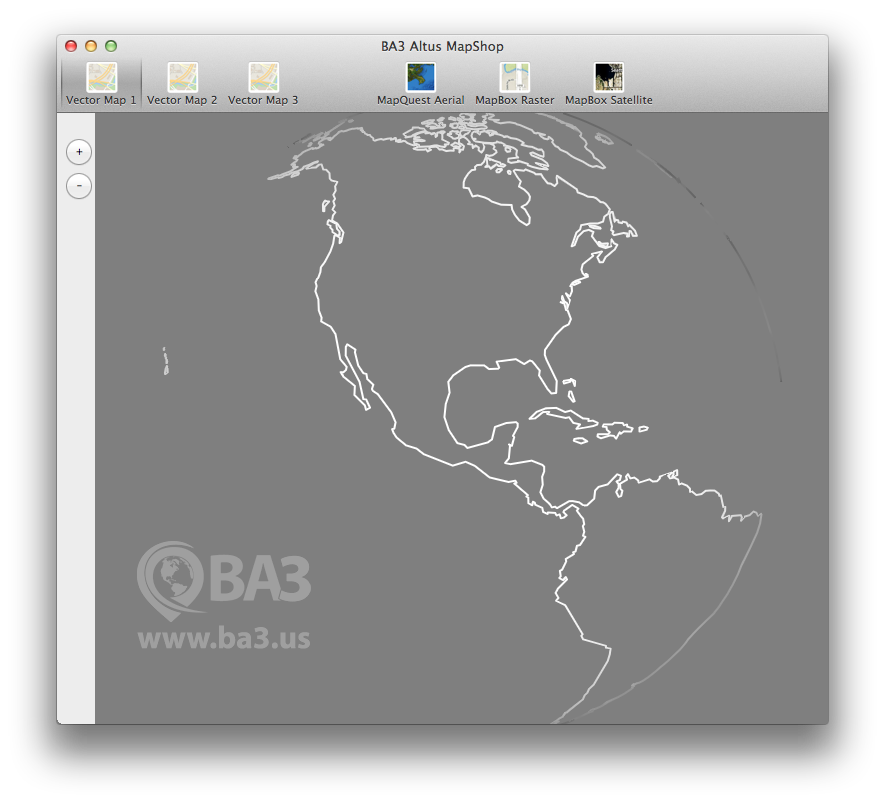
Would you like them to be red? Change the color in the Styles table to ff0000ff. Be sure that Base saves it to the table by clicking on something else. Then click on Vector Map 1 in Mapshop again and zoom in and out to see the coastlines in red.
What if you want Coastlines to be red and width 4.0 when looking at the full planet, and green with width 6.0 as you zoom in, and then blue and width 8.0 as you zoom in more? Add more lines to the Styles table like this:

This styling capability will let you style roads and other features at different zoom levels once you are working with OSM data.
What if you want to pick out a special set of coastlines, and then color them one way, while coloring other coastlines another way? The ne_110m_coastline table only really provides one column - the scalerank column - to do this. But we can set things up to take advantage of scalerank like this:
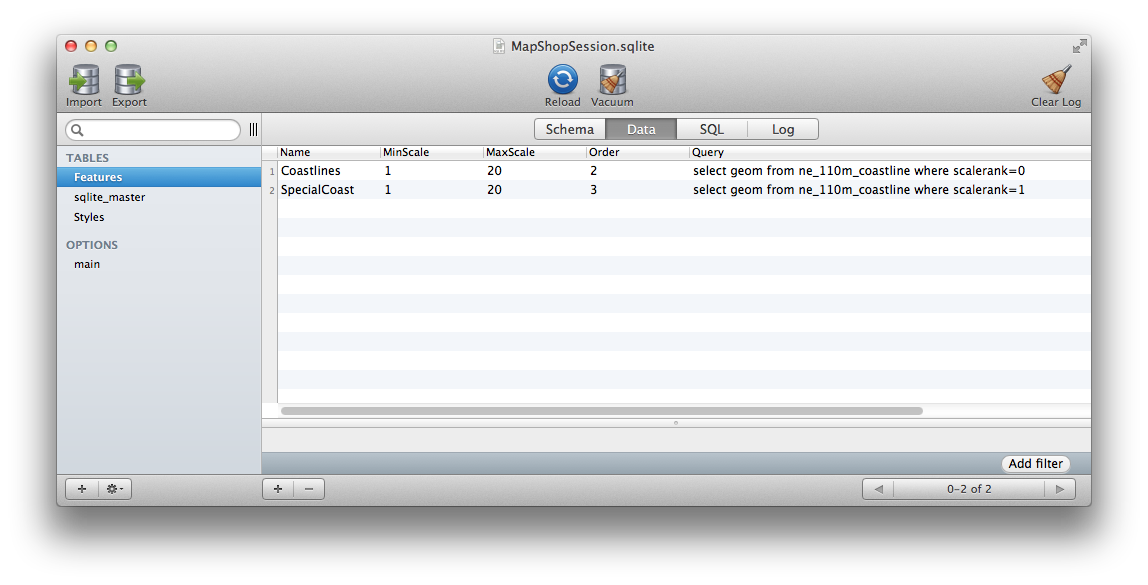

Smaller islands will consistently be colored yellow, while other coastlines will change color with zoom level:

Please note 3 things about Mapshop:
- Every time you make a change in Base, you will need to click the Vector Map 1 button in Mapshop.
- If it ever seems like you are changing the Features and Styles tables in Base but Mapshop is ignoring your changes, then try quitting Mapshop and restarting it, and/or try quitting Base and restarting it. If you cannot restart Mapshop, right click on the icon in the Dock and click Quit or Force Quit.
- If Mapshop crashes as soon as you open it, or if it is unresponsive, that usually means you have a bad query in the Features table. Check your queries. If you have a lot of rows in the Features table (more than 15), you may also be running out of Postgress connections. See this article for details.
Step 3
Step 3 will allow us to start playing with OpenStreetMap data. We will:
- Go get some OSM data
- Load it into the database
- Display it in Mapshop
You will need to download and install the program osm2pgsql from:
http://wiki.openstreetmap.
Then you will need to get some OSM data from:
It would be preferable to start with a small file here at the beginning. Let’s go to Asia and download the osm.pbf file for Malaysia, Singapore, and Brunei. At 19.5MB, this will download and import quickly (less than a minute). But really, you could pick any of the files if you are willing to wait.
Now let’s add the downloaded OSM data into our database by using this command:
osm2pgsql -C 4000 -c -d metool -S ~/Downloads/osm2pgsql-0.84.0/default.style ~/Downloads/malaysia-singapore-brunei-latest.osm.pbf
[After running this command, quit and restart pgAdmin3]
You should take the time to try running “osm2pgsql -h” on the command line and read the option descriptions for this command. There is nothing really complicated about it. When we downloaded osm2pgsql, the default.style file came as part of the package. The .pbf file is the data we are importing.
The osm2pgsql command will create four new tables in the database. You can learn about the contents of these tables here:
Now there is just one minor problem. The osm2pgsql command created 4 new tables. These tables contain geometry in the “way” column that we can use in Mapshop. But the geometry is in the wrong projection. It looks like this:

You can see that the “way” column has a 900913 projection, but we need it to be 4326. If you issue these two queries in pgAdmin3 (there is an icon for running arbitrary SQL queries), this problem will be corrected:
ALTER TABLE planet_osm_line ALTER COLUMN way TYPE geometry(LineString,4326) USING ST_Transform(way,4326);
ALTER TABLE planet_osm_polygon ALTER COLUMN way TYPE geometry(Geometry,4326) USING ST_Transform(way,4326);
If you look in the planet_osm_line table now, the way column will be in a 4326 projection.
While there, look in the “highway” column. It contains text labels for all of the different types of data in the table. We can use this column to handle styling of different road types.
To make some of the roads visible on the map in Mapshop, try styling things like this:
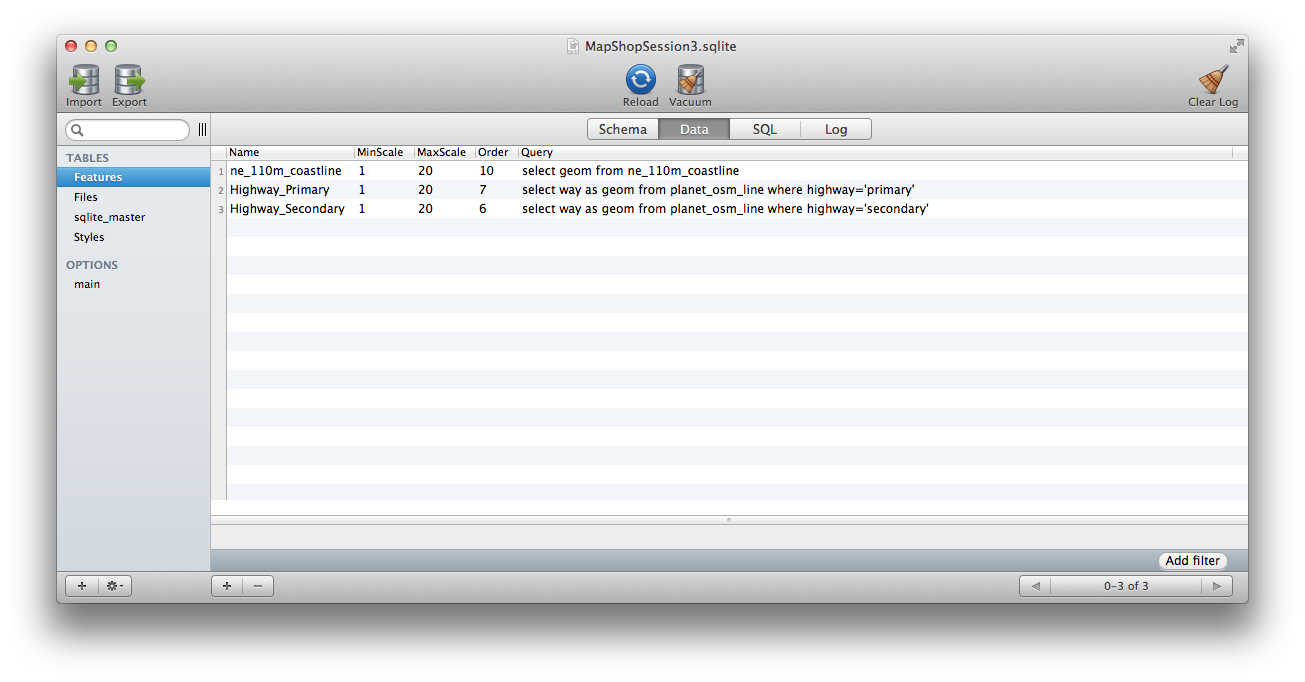

We have issued two queries to the database for the planet_osm_lines table. The queries retrieve primary and secondary roads. Then we have styled them so they are red at all zoom levels. If you pull it up in Mapshop and look at Malaysia, the roads will look like this:

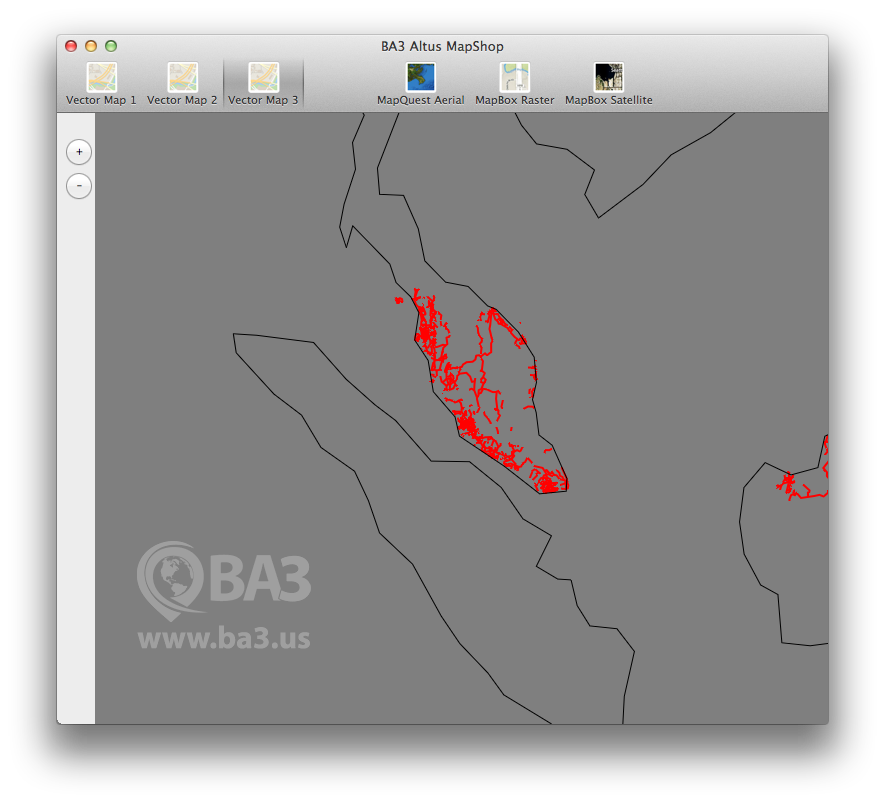
Obviously we would like to have all the roads displayed, and have them look different at different zoom levels. To do this you can create rich feature and style lists, as shown here (Download this sqlite file here):
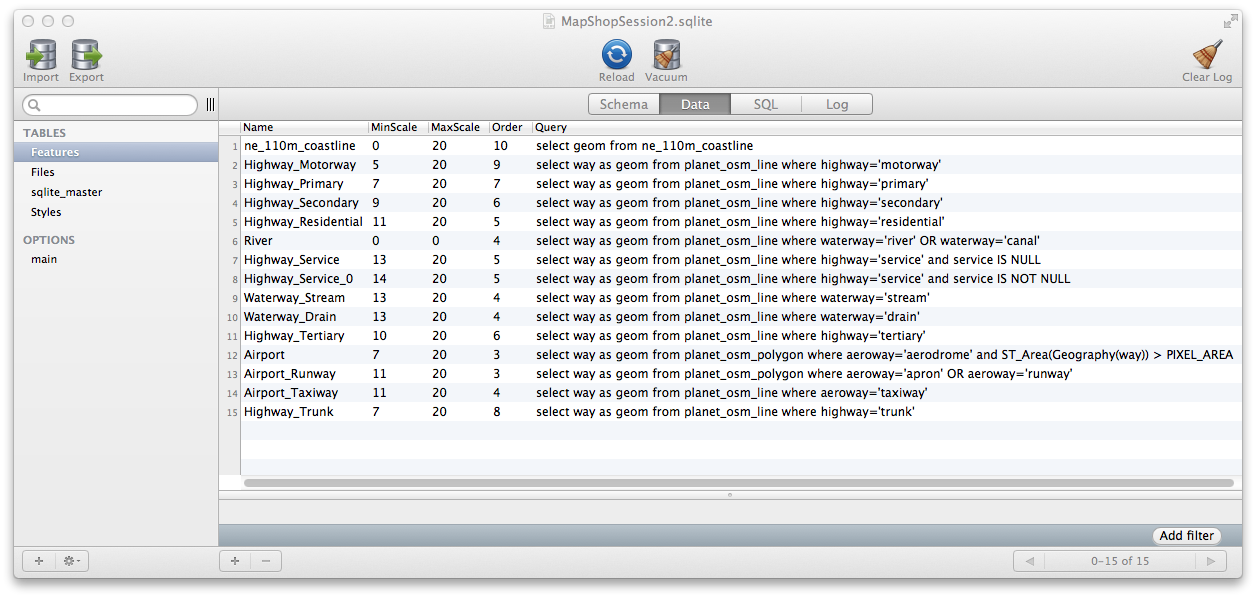
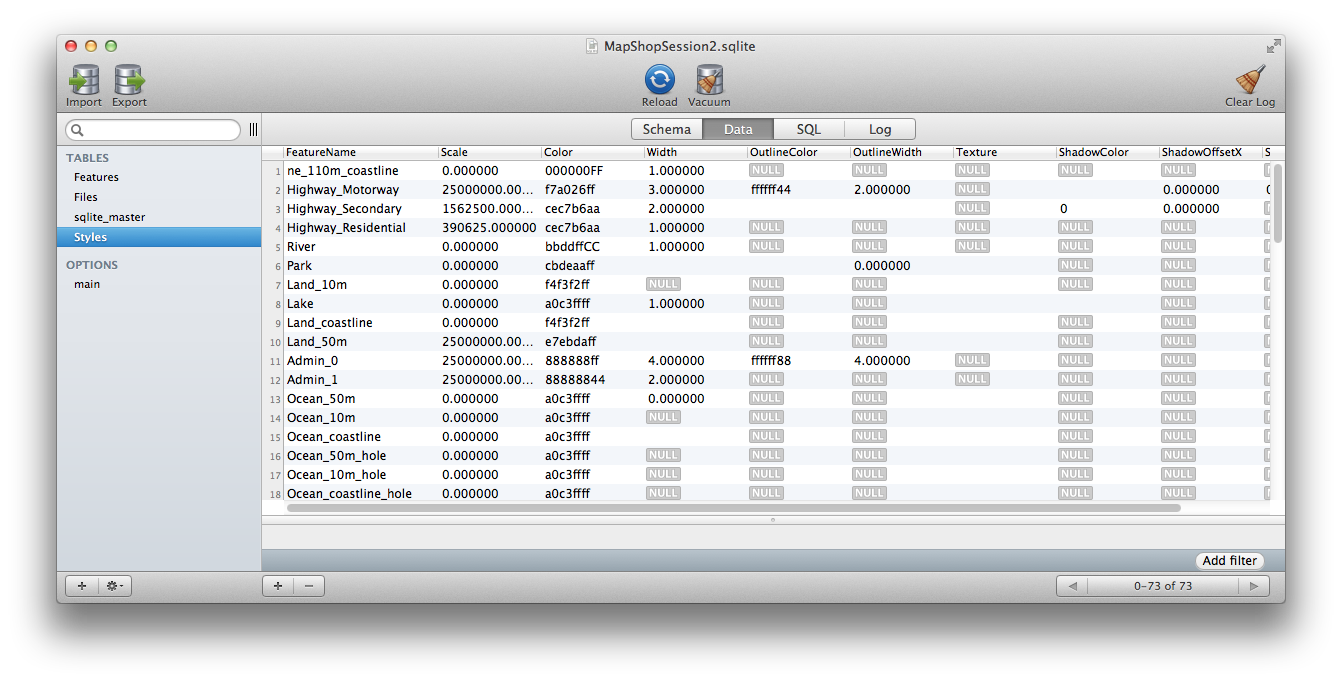
Zoom in a bit and this is what you will see at different zoom levels:


The sqlite file that created these screenshots can be downloaded here:
As you add more and more rows to the Features table, Mapshop may stop working. You will try to click the Vector Map 2 button and Mapshop crashes. This can happen because Postgres runs out of connections. This article shows a solution to that problem:
1000 connections in PostgreSQL on OS X
But as a general rule, what can you do to gain insight when Mapshop crashes or bogs down? One option is to run it from the command line like this:
/Applications/MapShop.app/Contents/MacOS/MapShop
You will get debug spew that will sometimes describe the problem.
Conclusion
Now that you have been through the cycle once, you can download lots of OSM data from http://download.geofabrik.de and try it out. Just make sure that you correct the projection problem (converting 900913 to 4326) as described in Step 3 above. You can also download other Esri shape files (the coastlines came in as a shape file). You can also import other types of vector data into Mapshop’s Postgres database and visualize it in Mapshop. Just make sure it has a 4326 projection.
Once you have a map looking the way you like it in MapShop, you can export your vectors to the BA3 Mapping Engine.
We understand that this is not a trivial process right now. We are working to simplify things, but we also know of many people using Mapshop in productive ways in this current form, and want to help more people come up to speed quickly.
If you have questions about Altus products and services, the demonstration code or licensing, please contact us at: [email protected]. Also, any feedback, comments or suggestions that you have are always greatly appreciated.
